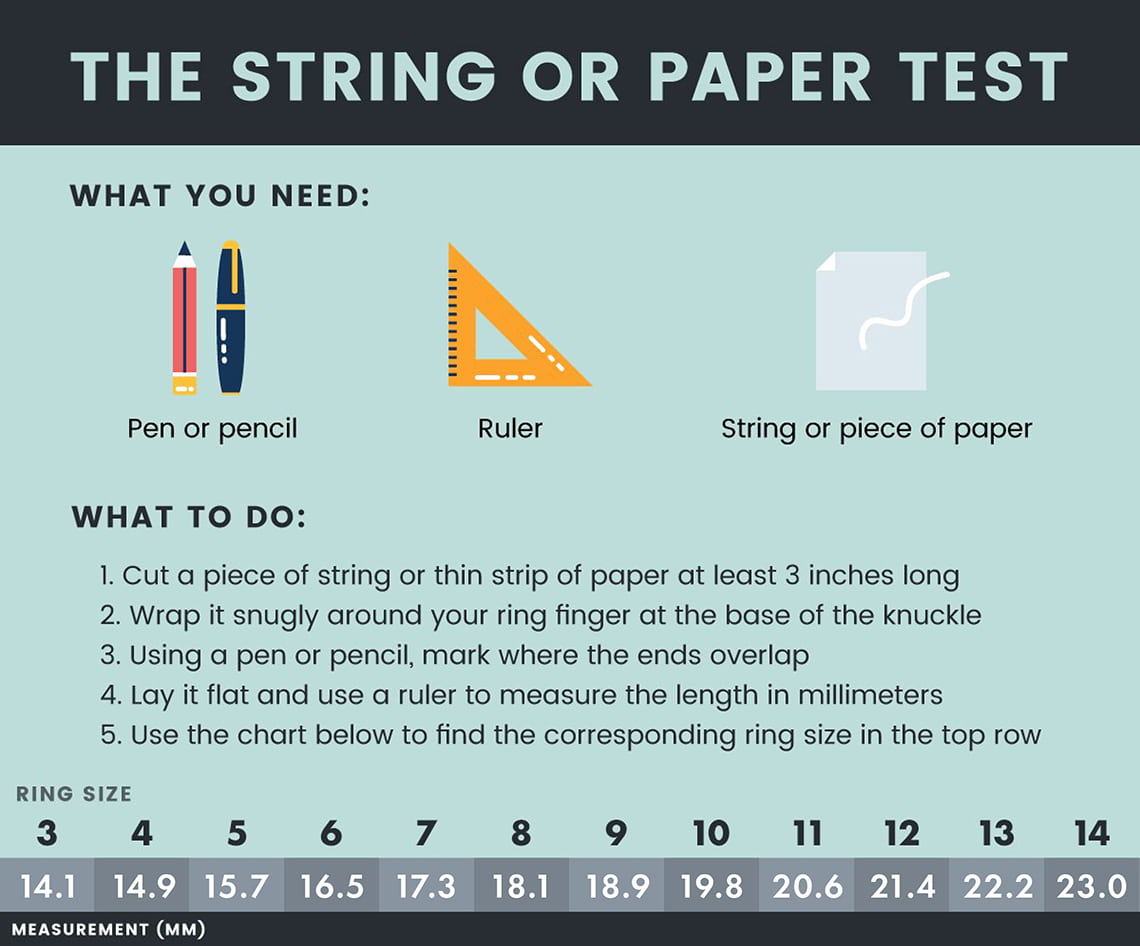
Table of Content
Now that you have built your screen, you’re ready to pick and print an image. As a beginner, it is best to stick with a simple design. A basic silhouette with clearly defined edges is a solid bet. The more complex the design, the more likely you will struggle with your first print.

As soon as you add a second color you need to be able to align your screens perfectly to get a good print. Set up an "exposure area" while waiting for the emulsion to dry. You'll need to expose the emulsion to a direct, strong light to prepare it. Following the specification on the photo emulsion bottle, set up a light above your flat black surface.
Choosing Process of Screen Printing Machine
Put your stencil backwards on the middle of the screen. The mesh will be lifted a few inches off the table and resting on the frame. Look at your stencil the way you want it, then flip it over before you put it down.
You can also save money by using plastic wrap painted with white-out in place of transparency paper for a really simple light emulsion screen. It is a semi-transparent fabric that you can use to make crafts. The screenprint was known as silkscreen print because people used silk fabric in this process. So, you definitely can screen print on organza bags. The course uses the Riley Hopkins 150 Complete Screen Printing Kit as a backbone, so you can follow along and get screen printing. The course is also packed with extra resources and helpful quizzes, so you’ll know the material inside and out.
Do you Mirror Vinyl for Screen Printing?
If you hold it up to a light bulb and can see through it, it’s not dark enough. Best shirts for screen printing, even though other fabrics are commonly used. As a beginner, it’s usually best to stick with t-shirts made from 100 percent cotton as they are easy to work with and generally yield the best results. If you want to launch a small business screen printing tees, you might considerthis even more comprehensive kit. This kit gives you everything you could need as a new screen printer, including a TechTongda 4 Color screen print station. You can much more quickly make stencils out of vinyl using an electronic cutting machine linked to a digital graphic design program on a computer.
If you use a design involving more than one color, use a color separating feature in the program to break the design into separate images for each color. You will need to prepare a stencil for each color in this case. Of course, you also need shirts to print onto! Ideally, you should find 100% cotton tees, though the cut and type of shirt are totally up to you. Pour a small amount of the fabric ink horizontally across the top of your screen. Grab that squeegee and use it to make a single smooth movement across down the screen as you exert strong pressure.
Silk Screen Printing at Home for Beginners
Big companies often have fancy drying machines that can do this, but most home printers use a heat press. You can learn how to screen print at home using the same techniques as a professional printer by following a few simple steps. You can also use a slightly simpler technique by referring to the “screen printing for beginners” section below. For best results, you will need aheat press to cure the ink after printing.

That’s because inkjet film has one side that’s coated and one side that isn’t. The coating holds the ink from the printer, and maintains the shape and density of your image. Generally, your inkjet printer will either use UV-blocking ink or a dye ink that stops all light.
How Do you Make a Silk Screen?
I had to figure out my exposure time since I constructed the box myself and did not know what it was. If you make a small print, you can even use a plastic wallet loyalty card. If you’re using a 500 Watt Halogen work light you can expect about 10 minutes. % of people told us that this article helped them.

It takes a bit of practice but you can definitely get it in just a few tries. Apply ink to the top of the screen and gently spread the ink with a squeegee over the image. We’re just flooding the design, not trying to press the shirt yet. It’s time to expose the screens and turn them into stencils. But first we need to coat our screens with Photo Emulsion. There are a few varieties but honestly, they all work pretty much the same.
The easiest way to screenprint is to buy screen printing kits from art supply stores. You will find screen printing stencils and readymade screens there. First, put the stencil on your screen and then apply ink there. Now use a squeegee to apply the ink all over it. Once your paint is dried, transfer the heat to it using an iron.
If you have been doing screen printing for a long and have a stable business you can have a flash dryer that can help automate the process of curing ink for you. Of course, screens are one of the most essential supplies in screen printing. They have different mesh counts, which you use for different applications. If you watch YouTube videos or have a screen-printing mentor, you might have a good idea what screens to use on your different weight t-shirts.
A common problem using hair dryer for curing is it leads to ink bleeding which will ruin the design as well as the shirt. The same effect the handheld steamer would create. Wholesale crewneck sweatshirts, tote bags, tank tops, hoodies… They can all be customized through the magic of screen printing. Once you have a design, you need to separate it into individual colors if the design contains more than one color. You also need to mirror the image if the direction of the lettering or pictures matters. These options work most easily in professional design software, so you may want to stick to one-color, simple designs if you do not have access to this kind of software.